Don't forget to call super.setSetTileActionHandler(...)!
What is a property viewer anyway
A PropertyViewer is an object that originates from the server, is sent to the client, and takes care of all GUI-aspects related to a single Item in the White Orb world. The specific tasks of a PropertyViewer are to:
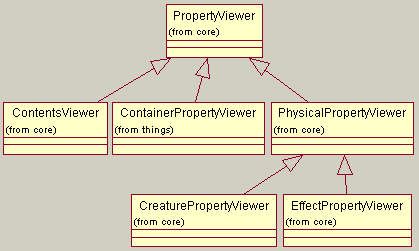
This is the top-level class for all PropertyViewers. It implements a simple PropertyViewer that could apply to ANY item, i.e. it displays the top-level properties: name and icon.
The PropertyViewer class also defines the structure of all more specific PropertyViewers (for example PhysicalPropertyViewer or CreaturePropertyViewer), which are to be implemented as subclasses of PropertyViewer.
Here's how an overview of the lifetime of a PropertyViewer:
Item has a method called getPropertyViewer(...) which returns an instance of a PropertyViewer who's specific purpose is to render a GUI for that item.
The PropertyViewer doesn't really do any good on the serverside. The client/server mechanism will instead send this object over to the client, and when the client receives it it calls viewer.setContext(...). This is the client's way of say "Hi viewer, welcome to the client. Here is your context, so go ahead and initialize yourself.".
setContext(...) is the "trigger" that tells the PropertyViewer it has arrived safely in the client, and that it is now time to construct the GUI. The PropertyViewer will do the following in this method:
- Fetch a Tile for it's item. This is available through getTile(). A Tile is a client-side proxy for an Item, so the server has an Item and the client has a corresponding Tile.
- Create the GUI. This is done through the method createGUI(), which is meant to be overridden by subclasses (assuming the subclass wants a different GUI).
- Subscribe to property changes from the tile. The methods getDefaultProps() and getDefaultChildProps() provide information about which properties are of interest to this PropertyViewer (i.e. which properties are being displayed in the GUI and need to be kept up-to-date). These two methods can of course be overriden by subclasses.
setContext(...) is not meant to be overridden by subclasses.
Finally the client will probably want to display the properties in the user-interface (why else go to all the trouble of fetching the PropertyViewer from the server?). PropertyViewer has a method for this: getComponent(). This will return an AWT component ready to display in a window or a panel. Two things to note here:
- The PropertyViewer itself is not a GUI-component - it is merely the model behind the GUI component. The GUI component itself is fetched using getComponent(). The reason for this is that it is not feasible to send GUI-components over the net. Instead a guy who knows how to create and manage the GUI-component is sent over (the PropertyViewer is this guy...).
- The GUI-component is not created in connection with getComponent(). Instead, it is created upon initialization - setContext(...).
| Name | Description | To be used by | Should be overridden? |
| setContext(...) | see above | The client only | No. |
| createGUI() | see above | Internally | Yes, in most cases. If not, the GUI of the subclass will be exactly the same as the superclass. |
| getComponent() | see above | The client and internally | No. |
| getNameComponent() | Returns the GUI-component displaying the name of the item: |
Internally from createGUI(), by subclasses that want to use this component in their GUI. | No. |
| getIconComponent() | Returns the GUI-component displaying the icon: |
Internally from createGUI() of subclasses (like above). | No. |
| getItemViewerComponent() | Returns the GUI-component displaying both the icon and name: |
Internally from createGUI() of subclasses (like above). | No. |
| getItem() | The item ID integer | Whoever | No. |
| getTile() | The Tile that this viewer represents | Whoever | No. |
| flashTile() | Implementation of the TileListener interface. Should cause the GUI to attract attention to itself by flashing or something. The current implementation does nothing, in the future some kind of flash will probably be implemented in the TileLabel and TilePanel classes. | The client, when for example this Tile is selected or an event occurrs | Usually not. |
| getContext() | the obvious... | Internally by subclasses. | No. |
| getStyle() | The current "style" of this PropertyViewer (see chapter below) | Internally from createGUI() of subclasses | No. |
| setTileActionHandler(...) | This is the object that decides what happens when the user tries to interact with a Tile (for example clicking on it with the mouse). | The client | Yes, in most cases. All Tiles being displayed within the GUI should be given the
same TileActionHandler, so this call should be forwarded through the container tree of the
PropertyViewer GUI. Don't forget to call super.setSetTileActionHandler(...)! |
| getTileActionHandler(...) | ... yeah... | The client | No. |
| setTitleVisible(...) | Sets whether the title component should be visible or not: |
Whoever | No. |
| tileChildAdded, tileChildRemoved, tileDeselected, tileDestroyed, tilePropertyChanged, tileSelected | These are all "notifications", i.e. the PropertyViewer is being notified of events related to the Tile that have occurred. | The client only | Yes, in those cases where new behaviour should be defined. Don't forget to call super.XXX(...) unless you want to kill the existing behaviour. |
| getDefaultProps() | Returns an array of property constants that this PropertyViewer wants to track (via the methods above). | Internally from setContext(...). | Yes, if you need to subscribe to new property values. If so don't forget to include the superclass' defaultProps. |
| getDefaultChildProps() | Same as above, but this time it applies to the children of the item. May return null if not interested in children at all (this is the default implementation) | Internally from setContext(...) | Yes (as above). |
Few propertyviewers should really need to worry about subscribing to events, since plenty of components exist that take care of this automatically. Here is a list of useful beans (all found under orb.client.beans) when assembling a GUI in the createGUI() method:
| Displays the icon of a Tile. Keeps itself updated if the icon changes. |
| Displays the name of a Tile. Keeps itself updated if the name changes. |
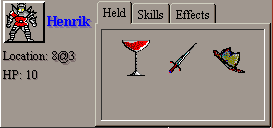
| Yes, a PropertyPanel uses a PropertyViewer. PropertyPanels could be use for
"nested" PropertyViewers. For example, the CreaturePropertyViewer (to the
left) contains three tabs. Each tab contains a PropertyPanel, so
CreaturePropertyViewer never actually had to implement code for tracking the contents of
those tabs. Instead, it uses PropertyPanels for it's "held" tile, it's
"skills" tile, and it's "effects" tile. In this case each
subpanel has setTitleVisible = false. So PropertyPanels are useful in any PropertyViewer where more than just one tile is displayed. |
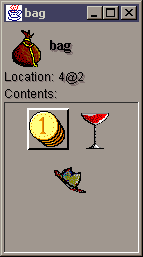 This is similar to a PropertyPanel, however it displays only the children of its tile, instead of properties of the tile itself. The picture to the right is an example of when to use it. Bag uses a ContainerPropertyViewer (under orb.things). A ContainerPropertyViewer inherits the icon and name components from PropertyViewer, adds a location component, and also shows contains an embedded TileCollectionPanel at the bottom showing the contents of the bag. |
Here is a list of the top-level PropertyViewer subclasses that exist today. This is good to know, partly because it is good to be able to study their source-code when learning how to implement your own, but mostly because you will need to decide which PropertyViewer subclass to inherit from when creating your own.
| This is how a PhysicalPropertyViewer looks like in the current implementation.
Icon, name, location, and effects are displayed. The icon and name components are
inherited from PropertyViewer, so the only additions are the location label and the
effects. Obviously, this is not a long-term solution. Most players will not notice "effects", so this is mostly for testing purposes. Later on the PhysicalPropertyViewer will probably be revamped. But then, of course, most subclasses of Physical should have their own property viewers. |
| A ContentsViewer does not show a name and icon by default, but can if desired (it is a
boolean flag in the constructor). A ContentsViewer shows the children of an
item. ContainerNode and all subclasses thereof can provide a ContentsViewer
explicitely by calling getContentsViewer(...). |
| OK, here's the question I feared - what is the difference between a ContainerViewer
and a ContentsViewer? Well, first of all, ContentsViewers are very generic, they are
used by ContainerNode and all subclasses thereof, available via the
getContentsViewer(). The ContainerViewer is a specialized viewer for Containers. Which raises the question - what is the difference between a Container and a ContainerNode? Well look at the White Orb hierarchy. A Container is a Thing is a Physical is a ContainerNode is a Node is an Item. Get it? So a Container is more "real", it has a location, effects, etc, like all other Things and Physicals, as opposed to a ContainerNode which is an abstract superclass for pretty much everything in the White Orb universe. So ContainerViewer is "prettier" and less generic than ContentsViewer. |
| A CreatureProperytViewer inherits the icon, name, and location components from
Physical. After that it adds the HP and the tabset to the right. CreaturePropertyViewer is a good demo of how to make a more advanced PropertyViewer. It is assembled using mostly other beans. This is ofcourse a temporary GUI. It will be updated when we have the skill and anatomy system in place. And the effects-tab is there for testing purposes (and for fun!), normally players can't see their own souls... :o). |
The PropertyViewer class chosen by each class' implementation of getPropertyViewer depends on how that Item thinks it should be portrayed in a GUI. If not specified, the PropertyViewer of the superclass is inherited. This is nice because this means you don't have to implement a PropertyViewer unless you actually want a different GUI.
Here is a summary of the current mappings:
| Class | getPropertyViewer() returns a... | getContentsViewer() returns a... |
| Item | PropertyViewer | no such method here... |
| Node | "" "" | no such method here... |
| ContainerNode | "" "" | ContentsViewer |
| Physical | PhysicalPropertyViewer | "" "" |
| Creature | CreaturePropertyViewer | "" "" |
| Thing | PhysicalPropertyViewer | "" "" |
| Collection | "" "" | "" "" |
| IndividualCollection | "" "" | "" "" |
| Container | ContainerPropertyViewer | "" "" |
| Bag | "" "" | "" "" |
("" "" means 'same as above')
By now you may have noticed an integer value called "style" being passed around when dealing with PropertyViewers. This represents the general layout of the PropertyViewer - currently two styles are supported: STYLE_TALL and STYLE_FLAT.
The createGUI() method should adapt itself to the current style setting (can be checked using getStyle()). This makes it easier to fit the PropertyViewer into the containing GUI (unless the PropertyViewer is floating in its own window). Look at the player client GUI.
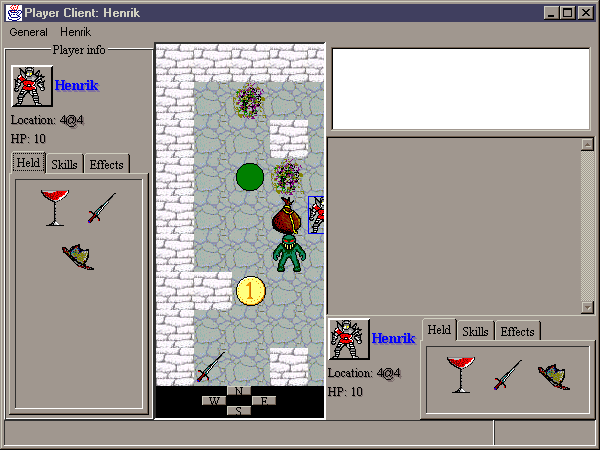
Here you can see examples of the two styles. On the left is a CreaturePropertyViewer with style PropertyViewer.STYLE_TALL. On the bottom right is the same CreaturePropertyViewer with style PropertyViewer.STYLE_FLAT. Thus the same property viewer can be fit into both tall and flat panels. Later on we may add more such constraint variables or take a more formal approach to size constraints (like specifying constraints in more specific ways, like using coordinates) but for now this is perfectly adequate.
I might someday create a GenericPropertyViewer which dynamically creates a GUI based on what types of properties the Tile has. In order for this to be possible, we must add some more introspection functionality. These GUIs will probably not be so pretty, but they will be very practical. Especially when dealing with Tiles that normal players won't be seeing, i.e. admin-related stuff, for which we don't want to spend lots of time building pretty PropertyViewer classes...
But this is for the future.
Now you know all there is to know about PropertyViewers, and are burning with eagerness to create your own. This final chapter will try to describe this in an easy step-by-step manner.
There are no strict rules here, it depends entirely on how you want the GUI to look. Although a general tip is to look at the Item hierarchy and extends the PropertyViewer that your item's superclass uses. PhysicalPropertyViewer is a nice one to extends, as it is quite simple but yet does add useful stuff like the location label.
Your GUI will most likely contain a mix of inherited components and new components. Create instance variables for each new component. Important: make these transient! Otherwise you will get NotSerializableExceptions when the PropertyViewer is sent from the server to the client. Here is an example from PhysicalPropertyViewer:
private transient TileLabel location = null;
private transient TileCollectionPanel effects = null;So PhysicalPropertyViewer inherits the name and icon components, but has it's own location and effects component.
First of all, you must let your superclass initialize itself. This is done using something like this (from PhysicalProperyViewer):
Component superComponent = super.createGUI();
Now you also have a reference to the complete GUI of your superclass. This is useful if you want to embed the superclass GUI as a whole. This is what PhysicalPropertyViewer does, since it does contain the complete PropertyViewer GUI (the icon and the name components).
In other cases you may want to embed only parts of the superclass GUI. If such methods are provided by your superclass (which they should be, if it was well coded) then you might add code like this:
Component effectsComponent = getEffectsComponent();
If you are subclassing PhysicalPropertyViewer then this method is provided. It gives you the GUI-component that displays the effects. CreaturePropertyViewer is a subclass of PhysicalPropertyViewer, and it uses this method to fetch the effects panel and place it inside the tabset. PropertyViewer has similar methods, like getIconComponent() and getNameComponent().
Anyway now you initialize your instance variables and put all these different components together into a new pretty GUI. The usual messy AWT-code in other words, putting components into panels etc. Don't forget to check getStyle() so that you get the right GUI shape.
After putting everything together into one component (typically a Panel), return it. Congratulations! This was the most complex bit.
This method should apply to all Tiles contained within your GUI, so make sure this call is propagated on to all your sub-tiles. Make sure you call super.getTileActionHandler(...) at some point. Here is an example from PhysicalPropertyViewer:
public void setTileActionHandler(TileActionHandler handler) {
if (location != null)
location.setTileActionHandler(handler);
if (effects != null)
effects.setTileActionHandler(handler);
super.setTileActionHandler(handler);
}
Hopefully most of your GUI is made up of beans that keep themselves updated. However there may be a few properties that you need to handle yourself. If so read on.
Implement getDefaultProps() and (if applicable) getDefaultChildProps(). If you do this then property subscriptions will be automatically setup for you by PropertyViewer.setContext(...).
Implement the event handler methods for the events that you are interested in (i.e. events that require you to update your GUI, and that are not automatically taken care of by the beans contained within). Here is a list of all the event handler methods in PropertyViewer. You are free to override any one.
public void tileSelected(Tile tile);
public void tileDeselected(Tile tile);
public void flashTile(Tile tile);
public void tilePropertyChanged(Tile tile, int propertyCode, Object newValue);
public void tileChildAdded(Tile tile, Tile child);
public void tileChildRemoved(Tile tile, Tile child);
public void tileChildrenAdded(Tile tile, Tile[] children);
public void tileDestroyed(Tile tile);If you override any of these, make sure you call super.XXX as well, so you don't accidentally kill some existing behaviour.
This is an optional step, and is only there to make life easier for further subclasses, i.e. other classes that want to subclass your class. These methods let a subclass pick and choose among your GUI elements when putting together its GUI. Here are examples of service methods (from Physical):
protected Component getLocationComponent();
protected Component getEffectsComponent();
public void setEffectsVisible(boolean visible);
public void setLocationVisible(boolean visible);
The getXXXComponent methods are protected because they are specifically made for the benifit of subclasses. The setXXXVisible methods are public because they are available to anyone. The reason for this is that getXXXComponent can be used to damage the GUI, while setXXXVisible methods are more safe. It is up to you if you want to follow this design principal, but I recommend it.
Congratulations, your PropertyViewer is complete!
You've worked hard, I can tell! Go have a cup of tea and let your brain regain some energy. Earl Gray is best, with two spoons of sugar and a few drops of milk (lab experiments show that this works best).
Which item-type should use this PropertyViewer? Override getPropertyViewer(...) in that class so that is uses your shiny new PropertyViewer subclass. Here is an example from Creature:
public PropertyViewer getPropertyViewer(AgentContext context) {
return new CreaturePropertyViewer(this, context);
}
Now you have done everything, and are ready to test! Modify TestWorld if necessary so that it adds some of your items to the world, run the client, and client on your item. Voilà! I bet you got a NullPointerException! Haha! Go back and debug.
I am quite satisfied with this design. However there are (of course) a few things to be improved/added:
Last updated: